WPF Open Folder Dialog
Learn how to use the new OpenFolderDialog in WPF with .NET 8 to let users browse and select one or multiple folders.
.NET 8 introduces a new OpenFolderDialog to Windows Presentation Foundation (WPF). This enables application users to browse and select one or multiple folders.
Usage is simple: create a new OpenFolderDialog, provide a Title, and an InitialDirectory. And if you want to allow your users to select multiple folders, set Multiselect to true. Next, a simple ShowDialog() call will have your dialog displayed.
var dialog = new OpenFolderDialog()
{
    Title = "Foo",
    InitialDirectory = Environment.GetFolderPath(Environment.SpecialFolder.Personal),
    Multiselect = true
};

string folderName = "";
if (dialog.ShowDialog() == true)
{
    folderName = dialog.FolderName;
}
Like with any dialog, if the user clicks the Select Folder button, ShowDialog() will return true, otherwise, it will return false.
The open folder dialog uses Windows Explorer for browsing and selecting the folders, just like the OpenFileDialog. As a result, the dialog will look different depending on your OS. On Windows 11, it will look similar to this:
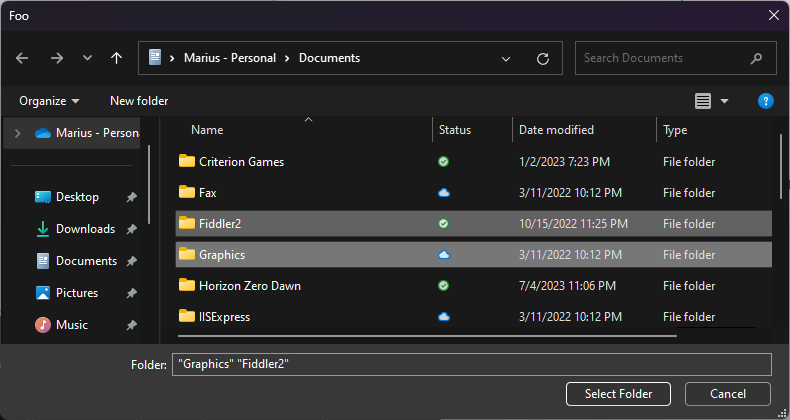
In terms of output, you’ve got several properties you can use to get the user selected folders. For single selection:
dialog.FolderName -> "C:\Users\test\OneDrive\Documents\Fiddler2"
dialog.SafeFolderName -> "Fiddler2"
In case of multiple select, you can use:
dialog.FolderNames -> [ "C:\Users\test\OneDrive\Documents\Fiddler2", "C:\Users\mariu\OneDrive\Documents\Graphics" ]
dialog.SafeFolderNames -> [ "Fiddler2", "Graphics" ]